
What is the Best Gate Wheel?
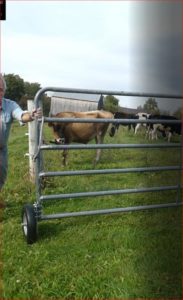 Time and gravity can take their toll on metal and wood gates causing them to sag. Gates that are unable to swing freely and sag tend to be difficult to open and close and gates can be heavy, and frequent opening and closing will cause wear and tear on both the gate’s hinges and any portions of the gate that come into contact with the ground. Adding wheels to a gate can go a long way toward extending its life, as well as make its use far simpler. The process of wheel installation varies slightly depending on the material that gate is made of. Before attaching wheels to your gate, you also need to verify that the gate is square by confirming that the diagonal measurements are equal. Use a carpenter’s level or check the lower rail it should be the same height off the ground on both the near and far ends. If this is not the case, you may need to make adjustments before installing wheels. If your gate is wooden, wheel installation is a fairly simple process. Wheels for wooden gates typically come on a long bracket. The bracket itself is screwed into the back of the gate, and the wheel sits just beneath the bottom of the gate. This requires only basic tools and hardware. Wheels for metal, vinyl or chain link fences are often called helper wheels. These also attach a bracket. In this case, the bracket is U-shaped and has a bolt at either end. Installation requires only the removal of the bolts, hooking of the bracket to the fence and replacement of the bolts. This tends to be a poor solution as the wheels are usually only 6” or 8” diameter. The best solution is Tech Team’s #767 16” Flat Free Farm Gate Wheel https://techteamproducts.com/product/commercial-grade-16-diameter-agricultural-gate-wheel-00767/ https://www.amazon.com/dp/B0851QDGZM?ref=myi_title_dp it’s a total beast and will handle the toughest of sagging gates. Even if you do a hey Alexa or hey Siri Google search, you will not fins a better one. Check out these videos: https://youtu.be/OvmIZtE0IyM https://www.bing.com/videos/search?q=+gate+wheel+how+to&view=detail&mid=5FD2831A988B8EEF732F5FD2831A988B8EEF732F&FORM=VIRE
After carefully reading any instructions that came with your wheel kit or wheels, place the wheel beneath the gate where you intend to attach it. Holding the wheel and gate firmly, as if they were already attached, swing both outwards. Be sure the wheel can spin completely in every allowable direction and isn’t impeded by anything in the yard or driveway. Next, while still holding the wheel in place, use a pencil (for wood and vinyl) or piece of tape (for chain link or metal fences) to indicate where the wheel should attach to the gate. Once you’ve finished marking this place and where any bolts or connectors will go, remove the wheel. If you are working with wood or a material that permits drilling a hole, do so in the place you have marked. Then, for all gate types, attach the wheel in the place you indicated with your pencil or tape. Once you have finished installing the wheel, test the gate and be sure it opens the way you hoped it would. If it does not swing freely or open completely, adjust the wheels until you are satisfied.