Lighting and Using an Oxy-Acetylene Cutting and Welding Torch How to
Igniting, adjusting and turning off an oxy-acetylene torch is a detail-by-detail process that can be easier than it looks, especially when you follow the correct procedures. Most of the start up and shut down process is common sense but, it is always best to read and follow the torch manufacturer’s instructions step by step because, let’s face it, they probably know a lot more about it than you do. Also, if a you tube video is available, watch it.
Preparation and safety are everything. Make sure you are wearing OSHA and ANSI approved eye protection before starting this procedure and if you are going to use the torch make sure you wear the correct gradient cutting goggles. Before you start there are several things that you need to pay attention to:
- The very first thing to do is make sure that the valves on the top of the oxygen and acetylene tanks are 100% off.
- Typically, the pressure adjusting valves on the regulator set have T handles. Turn these counterclockwise until they stop.
- Turn the oxygen and acetylene knobs on the torch body clockwise all the way so that they are 100% off.
- The acetylene (red or orange) tank is a relatively low pressure affair at 75 psi maximum but, the oxygen tank is another story that can be over 1000 psi. For this reason, it’s a good idea to step around to the back of the tanks, and away from the regulators, when you open the valves on the tops of the tanks. When you open them do it slowly and one at a time.
- Now you are ready to adjust the oxygen and acetylene pressure. It doesn’t matter which one you do first. For the acetylene, turn the T knob clockwise slowly until you get into the 3 – 5 psi range. Do the same for the oxygen but, this time set the pressure to 50 psi +/-. You have set the static pressure settings. To make sure the dynamic (in use) settings are correct open the knurled knobs on the torch body then readjust the regulators if necessary. Now press and release the oxygen blast / cutting lever on the torch body to reconfirm the oxygen r regulator setting.
- One thing you need to pay strict attention to is the orientation of the cylinders. For the oxygen tank, it doesn’t matter what angle it sets, it can even be upside down. The acetylene bottle is another story, it must always be set vertically, this even includes when it is being stored or transported.
Now to light the torch
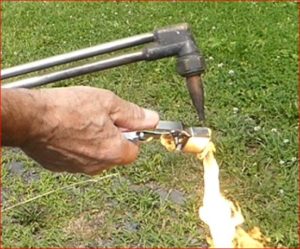
- Open the knurled knobs on the torch body for 2-3 seconds to purge any air then just crack the acetylene knob, maybe ¼ to 1/3 turn to start the flow of gas. Now, holding the torch away from you and the nozzle pointing away, use a flint welding torch striker to light the acetylene gas. Do not use a match as it may take several attempts and your hand will be right in the way of the flame. A hooded safety welding torch striker of the type made by several companies such as Hobart, Forney or Tech Team is the way to go. Tech Team’s #763 https://techteamproducts.com/product/triple-flint-spark-lighter-00763/ https://www.amazon.com/dp/B07NGS8PLY?ref=myi_title_dp It has a protective hood and has 3 integral flints on a carousel. You could do a hey Alexa or hey Siri Google search for other options or just watch the you tube video https://youtu.be/30k1AJwStbk
- When you first light the torch the flame will be weak and smoky. At this point increase the acetylene flow until the flame leaves the tip of the nozzle and there is no smoke then decrease the flow until the flame touches the tip.
- At this point slowly open the oxygen valve and adjust the flame. If you open the valve too much or too fast, you can blow out the flame and need to start over . Now depress the cutting lever to make sure it functions properly. If the flame makes crackling sounds or blows out, you may need to clean, or replace, the nozzle
To shut down the torch
- The first thing to do is close the oxygen and acetylene valves on the torch body
- Now tightly close the valves on the cylinders / tanks making sure that they are 100% off – no leaking.
- Open the knurled valves on the torch to purge the lines
- Go to the regulators and turn the T knobs counterclockwise until they stop to bring the pressure gages to zero.