
How to Tips for Oxygen Acetylene Cutting
How to Tips for Oxygen Acetylene Cutting
There’s a lot of difference in using the right stuff and the right pressures and the right settings and right techniques for getting a good cut. It is very important to have the correct pressure settings for the tip and thickness of the steel you are working with. A quick Hey Siri or Hey Alexa search will get you the correct information. There’s lots of other fuel gasses like propane, map gas, propylene and all that. I’m talking strictly about acetylene because it seems like more hobbyist’s and more small fabrication shops use acetylene than other fuel gas. So before you light up, after making sure that everything is in good order, your cylinders are chained securely and everything. There is a sequence of setting up and shutting down the torch.
Make sure that there’s no pressure on the gauges at all on either side and that the adjustment screws are loose and there’s no tension on the springs to turn the gas on. You want to see how much gas is in the cylinders and you want to see those needles move. I’ve watched a lot of guys and typically they turn it on just a little too fast. You want to turn this on very, very slow. There is a phenomenon called the heat of re-compression. If there’s already pressure in there and you shoot a bunch of additional pressure in, the temperature spikes momentarily. All it takes is a speck of dust, a little bit of oil, anything in there and it becomes fuel and you get a regulator burn out. If you don’t believe what I’m telling you just Google accident regulator burnout. You will find all kinds of things, all kinds of reports where people have been injured by turning the gas on too fast. You don’t need to see the needles move you can see them after the fact. So really, the safe thing to do is get at arm’s length and look away. Once you get it done, you can crack it open as fast as you want and backseat oxygen that valve because it’s a backseat valve. It’s a high pressure cylinder, oxygen, nitrogen and others are high pressure cylinders and have a backseat type valve. With acetylene you don’t have that same risk, but you still don’t want to turn it on fast. So I want to crack it open slow, but you only want to turn it maybe half a turn. Sometimes half a turn won’t even make the regulator register, in which case you’re going to have to turn it maybe three quarters. But the point is, don’t turn the acetylene open all the way, because if something bad happens, you want to be able to shut it down quick, like with one turn of the wrist or two at the most.
Sometimes the acetylene valve stems leak and sparks will ignite the gas leaking around the stem. Maybe the valve’s packing isn’t just right, and you get a flame and you kind of want to be able turn it off quick without crank crank, crank. In fact, there is a point at which you don’t even want to turn it off. With flames shooting up high, it’s time to get out of Dodge. It’s not time to grab a glove and try to crank that thing shut. That’s a judgment call. The CGA, the Compressed Gas Association, basically says that as long as it is safe to do so, if there is some kind of flame here, then turn it off. So turn the valve open roughly half a turn. Now, where do you set these gauges? Do you set them at 10 and 40? Not really. Because it depends on what tip I’m using. It depends on the thickness of the metal. It depends on the manufacturer’s guidelines. Torch heads like Victor, Harris, and Forney are all different. They mix differently. There’s different designs. Smith, for instance, has an in the head mix and Victor is in the body. It requires that you do your homework and have tip charts recommending the safest and often most optimum pressures to get a good cut.
One way, if you do not have any manufacturer’s tip guide, is to determine the center hole size by using a drill index and then consulting some type of a chart. The center hole is really the main thing when determining how much oxygen pressure you need. Somebody emailed me about this little cool little book called The Welding Pocket Reference. You can get it on Amazon. And I ordered it just to see if it was any good and see if I could recommend it. Well, I can recommend it. It’s a good book. Another one is The Welding Encyclopedia. These are hard to get. You’re gonna drive yourself crazy trying to get a good one. Being a 1964 book, you would think it wouldn’t be useful. However, it’s very useful. There’s an old saying, if you need a new idea, read an old book and I think that’s very true. Probably the reason is that these days we’re so smart that we forgot a lot of the basics. It reminds you of a lot of the things that you should already know. Once you know the settings, once you determine the pressure settings are done to the manufacturer’s guidelines either using a drill index and looking it up in some other reference manual, set the regulators. Then after you do that, open each torch valve momentarily to purge a little while you make sure you don’t have any mixed gases.
Make sure you’ve only got acetylene and only got oxygen in each line. And then when you light, only use acetylene but use a full half turn that way you won’t get the little wimpy little flame with a little black paratroopers that get all over your face, you’ll get a good safe flame with a lot of flow that won’t pop back and you won’t have a mixed gas situation going on inside the torch body with the potential for a flashback. If the flame jumps away from the tip, which a lot of times it does, you’ve got to back down and then increase it to where the soot just starts to go away. If there’s barely any soot in the flame that’s your reference point to get the most out of a tip and to have adequate flow to keep that tip cooled off, keep it from getting hot, and keep flashbacks from happening. Then add oxygen to the flame and continue adding oxygen to get a neutral flame, which means basically your cones define without any feathers on the end of them. And then when you give it a little extra pressure by hitting the oxygen lever you might have to add a little oxygen to keep those flame from changing much on you. Now you’re ready to cut.
You should have proper eyewear. I like to use an auto darkening welding helmet. The Miller digital elite force has sensors on it. It’s a really good helmet and you can keep your cheater lens on in there, and I can set it to shade three for a grind mode or shade five for a cut mode. It doesn’t know whether I’m cutting or grinding. And depending on how thick cutting I’m doing, I might set it on 5, but shade 3 sometimes is good for cutting.
Use the right size tip for the right size job and you get a lot better cut. I usually cradle one hand in the other hand, make a few dry runs and then I can make circle cuts. I can make a good 12, 14 inch long cut without any problem. Frequently when you are using a torch to cut metal, you need to mark where you are going to cut. There are lots of ways to make a mark or a line that range from using a magic marker or sharpie, or just scratching the metal with an awl. The best way to make the marks you need is to use soapstone, which is the solid form of the same talc that is used in talcum powder. The handiest way to do this is to use pre-cut rectangular (127 x 12.7 x 4.8mm) prismatic pieces of talc, which are held in a special pen shaped device with a pocket clip that allows the talc to be firmly held and advanced as the talc wears down. These soap stone holders are available from many companies such as: Forney, Ally Tools, Hobart, Firepower, and Tech Team® https://techteamproducts.com/. We happen to like Tech Team’s model 759 the best https://www.amazon.com/Soapstone-Retractable-Oxy-Acetylene-Tech-Team/dp/B07NGJ4MB1/ref=sr_1_3?keywords=tech+soapstone+holder&qid=1565098360&s=gateway&sr=8-3 because it has a durable zinc finish and a positive locking and advancing mechanism for the soap stone.
Of course, you also need soap stone, aka talc, to feed the holder as you wear out the soap stone. Those refills are available from several companies such as: Homee, Anchor, VasTools, Uniweld, Hobart, and also Tech Team® https://techteamproducts.com/. We like Tech Team’s 757 36 pc. of soap stone https://www.amazon.com/Tech-Team-Soapstone-Machining-Surfaces/dp/B07JMFBFW3/ref=sr_1_44?crid=13B5M9FVHOOXU&keywords=soap+stone+holder+welding&qid=1565097627&s=gateway&sprefix=soap+stone%2Caps%2C128&sr=8-44 the best because it is high quality, bright white soap stone that leaves clear and easy to erase marks on almost any metal surface.
I use about 10 PSI on the acetylene and about 45 to 50 PSI on the oxygen for a three quarter inch cut. What you want to do is try to go smooth and steady. Don’t go ultra slow. You’ll know if you go too fast, it’ll blow back on you, and it won’t cut all the way through. So you kind of find where that melted edge is and where you can go just fast enough, or just slow enough to make the cut and fast enough not to leave a bunch slag.
Now, when you’re done cutting for the day, there is a certain way you need to shut down. To shut down, you want to shut the fuel gas down first. Now, manufacturers vary on this, but most will tell you, turn the fuel gas off and then it turns the flame off. What’s next? This is a critical step, because if you can remember this, everything else will make sense going forward in the shutdown procedure. First thing you do is shut your flame off turning the fuel gas off first, then the oxygen. This is how you shut down properly. Leave pressure, that’s the dangerous situation for the next guy. Remember the re compression thing that I mentioned earlier.
The next thing is bleed off. I do that most quickly by hitting the lever so that it goes all the way down to zero on the gauges. Then I’m going to bleed off the acetylene all the way down, and then what I wanna do is back the regulator screws off to where they’re loose, no tension, no spring tension. That leaves it safe for the next guy. In case he doesn’t remember, we didn’t leave any pressure in there. The main thing is don’t turn on all of a sudden, make sure before you even turn on that you don’t have any pressure on the gages. That way there’s no pressure in between the regulator body and the main cylinder valve. The other thing is, don’t add oxygen to the flame when you’re lighting. That just creates an extra risk, it’s a risk of flashback. Always have check valves, you know, at the bare minimum.
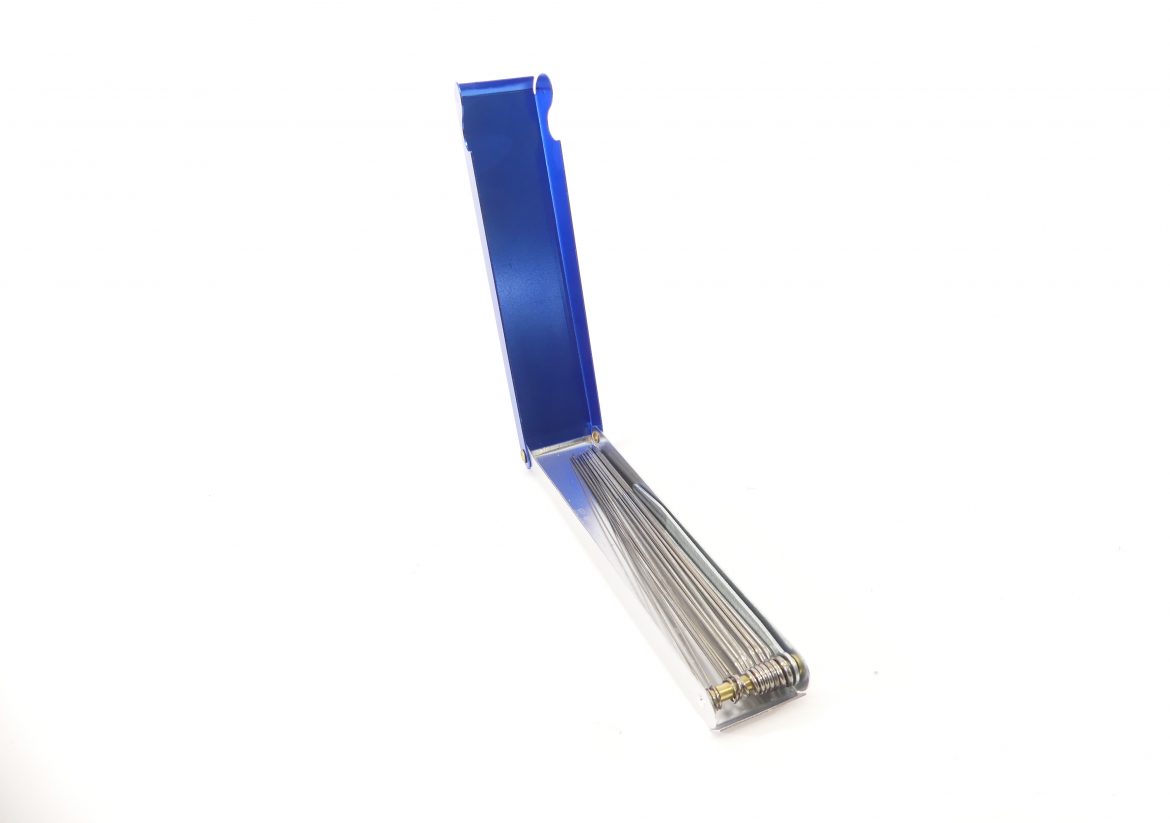
Remember keep your tip clean, get comfortable before you start, and concentrate on the cut while it’s happening. Good brands of tip cleaners include Victor, Irwin, US Forge, and Tech Team https://techteamproducts.com/. We like Tech Team’s 762 Tip Cleaner Set because it has all the correct size reamers, a file, and it comes in a handy storage case. https://www.amazon.com/Tech-Team-Long-Pattern-Cleaner-Oxy-Acetylene/dp/B07NGV9CS2/ref=sr_1_1?keywords=tech+team+tip+cleaner&qid=1553187220&s=gateway&sr=8-1