
How to Install Kitchen Cabinets
How to Install Kitchen Cabinets
I’m going to install beautiful Merillart cherry cabinets in our small kitchenette, and basically, we just want to get these cabinets level and secure so they’re ready for the countertops and all the fixtures. I’ll bet that you have the tools around the house to install cabinets, you just need a few tips and some advice to get the job done. First there’s plenty of free planning and design advice available at your Merillart, American Woodmark, or Ikea cabinet retailer showroom. That could also be your local Lowes or Home Depot, you can go in there and they’ll lead you through the process of choosing the door types, the wood types, the colors, all of that. Then once the cabinets come, we kind of get a feel for how they’re going to fit together. We’ve got 12 inch base cabinet on one side of the L that goes around the corner. We’ve got a 24 inch deep base cabinet and next to that is a 24 inch deep sink base, and then finally, we’re going to have a refrigerator so we’ve got an end cap that will install and sort of tie it all together.
The first order of business is to start in the corner and get those cabinets secured. Since we have what are called full faced doors that cover the entire face of the cabinet, we need to make sure that the doors will be able to open and operate correctly so we’re gonna have to install spacers that will go on the ends of each of these 2 cabinets. I’ll start that process by taking the doors off so I can get to the frames to screw those in. Now, to install the spacers, it’s the same as installing two cabinets together, we’re basically going use Irwin wood clamps to clamp the spacer to the edge of the cabinet so we’ve got a nice tight joint and then we’re gonna use our Ryobi variable speed drill to drill a pilot hole and then we’ll install the spacer using some wood screws. Now, if you’re using some of the new Irwin clamps that have rubber feet, that’s great they are pretty safe but, if you’re using an old Stanley type C clamp, you need some wood blocks for pads to make sure you don’t mark the wood. Make sure the faces are nice and flush and drill three or four pilot holes. The screws will go and easier with pilot holes and you’ll keep from splitting the face of the wood. To form the corner, butt the two cabinets and clamp them together at the top and bottom. Check for an even reveal then drill pilot holes and fasten with wood screws.
Now that we’ve got our spacers in place in the corner, we check for level wood using an Irwin 24” bubble level, check for square using a Kein framing square , and we want to attach the two cabinets to the wall and we’d use a stud finder to find the studs behind the plasterboard so that we go right into them. Now you want to drill through the top rail, which is the thicker part of the wood, and then in through the plaster and into the stud. You only need, with base cabinets, to put screws in the top rail, you don’t need to put any in the bottom. Now we’re going to put the sink base into place. But first, we got to cut some holes in the back of the cabinet to make some room for our rough plumbing. Once we’ve got our marks, a Klein Tools hole saw makes easy work of cutting out the rough plumbing access. These can be bought at Home Depot, Lowe’s, Menards, or online from Amazon. It’s a false front on the sink base since there’s no room for a drawer with a sink in there. Just take that off so we can get in here and attach it to the other cabinet and then to the wall.
In order to make our initial rough leveling adjustments a block of wood and a pry bar are very useful. Pry bars are incredibly handy. They can be used for a wide range of both automotive and around the home repairs and construction projects. They can be used for scraping, for lifting tile, for leveling windows and doors when newly installed, and a whole range of other applications. Pry bars are made by numerous companies such as Tekton, Stanley, Snap On, Mayhew, ANB, Performance Tool, Gear Wrench, and Tech Team https://techteamproducts.com/. The one we like the best is Tech Teams model 707 5pc. Pry Bar Set https://www.amazon.com/Mechanics-Prybars-Chisel-Angled-Rolling-Head/dp/B07CSBZ4ZM/ref=sr_1_11?s=power-hand-tools&ie=UTF8&qid=1540409708&sr=1-11&keywords=pry+bar+set as it has 5 different sizes, each one made from high tensile heat treated carbon steel with a comfortable and functional plastic grip.
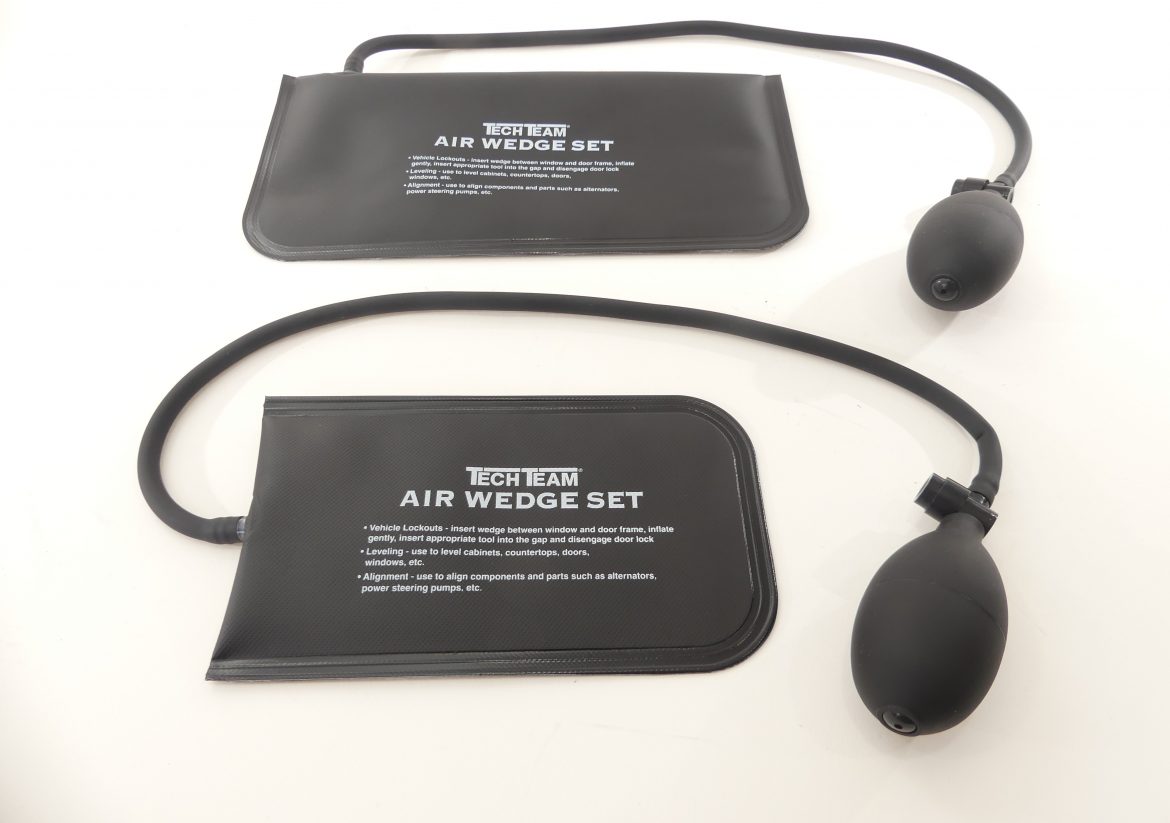
Wood shims are helpful to level the cabinets and keep them square. Just like attaching the spacers, clamp the cabinet faces together so they’re flush drill pilot holes and fasten with wood screws. With the faces connected, mark the stud locations and screw the cabinets to the wall through the top rail, you may need to repeat these steps several times, depending on the size of your kitchen. The ideal tool for leveling panels is an air wedge. Air wedges are tools that are extremely helpful when leveling and aligning items such as pool tables, kitchen cabinets, and other items that require very small increments of movement to get them properly aligned and level. An air wedge incorporates a large surface area that can easily inflate using low pressure air from a hand bulb so it can lift 300-400 pounds. An air wedge with an internal stiffener so it can slide into small spaces is even more useful. Air wedges are made by several manufacturers such as: Vinki, Rhino, Calculted Industries, Arisd, Winbag, and Tech Team https://techteamproducts.com/. We like the one made by Tech Team the best. Their #755 Air Wedge https://www.amazon.com/Automotive-Inflatable-Internally-Tech-Team/dp/B07VN8417R/ref=sr_1_1?keywords=tech+team+air+wedge&qid=1566306915&s=gateway&sr=8-1 it has the internal stiffener and is made from high quality plastic for a long service life.
Now we’re going to install the end panel. They’re used anytime you have an appliance under the counter at the end of a run of cabinets, for example, an oven or maybe a dishwasher. So a lot of people have panels in their homes. What we’re gonna do is use a pneumatic brad tacker to install a vertical cleat to the wall and then we’ll nail the panel to the cleat. We’ll make sure that this cleat is nice and plumb before we install the panel. I’ve also got an L bracket, which we’ll use to install the front part of the panel to the floor. It will be nice and sturdy when we’re done. Align the face of the end panel with the other cabinets and use finish nails to attach it to the cleat. We’ve got a little gap, but we’ll use a piece of trim to finish that edge. Now we’ll level the front of the panel, drill our pilot holes and install the L bracket.
Well, all you’ve got to do now is get the doors back on and get them all squared up and looking good. And you can move on to the countertops. Cabinet door hinges are typically adjustable. We’ll tighten them up just enough to check that the door heights match and then adjust before tightening them completely. This is a small kitchenette. But these same tips and advice will work on any sized kitchen. You might want to get some additional ideas for this project. Therefore, a good place to start is a Hey Alexa, Hey Siri, or Hey Google search for the best way to install kitchen cabinets.