
How to paint and install a headboard
How to paint and install a headboard
Last week I made a headboard and this week I’m going to paint it and install it and get started and prepare it. The Benjamin Moore paint came in this morning and I gave the whole headboard a quick sanding about an hour and a half, basically smoothing out any imperfections and softening any sharp edges. Once that was done, I primed the whole headboard using Fresh Start by Benjamin Moore. It’s a latex primer and whenever you use a latex primer on wood, it’s going to raise the grain and give the wood sort of a rough feel. And so what I like to do is prime the project that I’m working on and that will sort of emphasize any imperfections in the project. Then I can really see them, and I’ll come back later and fill any of the nail holes and anything else, like maybe a minor defect that isn’t quite tight. I’ll let that dry and then I’ll sand the primer and sand the fill with 220 grit aluminum oxide sandpaper from Home Depot all at the same time.
What I like use for wood fill is joint compound, just everyday spackle. And that’s a little trick that my buddy, who’s a house painter, showed me and I’ve been doing the same thing now for a couple of years. What’s nice about it is it sounds really easy as you sand the primer, it’s easy to sand the spackle or that wood fill. If you are uncomfortable with this go to Hey Google or Hey Alexa to find other wood fill products. The next step is to just go around and fill any of the little nail holes. I’ve finished filling all the nail holes yesterday and I’ve come in early and the spackling is dry so I can sand the headboard, sanding the primer and spackle at the same time. I’m using one hundred grit silicone carbide paper and I’m going to be sure to wear a dust mask. Now occasionally I’ll get e-mails from people asking me why I wear a respirator as opposed to classic dust mask? And the simple answer is the respirator is comfortable and I feel like it just works better. Now I finish sanding the headboard and sanding the primer and the sparkle. The next step is to give the whole headboard another coat of primer. A pretty useful trick when you’re using multiple coats of latex paint is to wrap the brush in between coats and that’ll keep the brush from drying out and what I like to use for this is packing plastic. It works really well and it’s a pretty good time saver. I finish painting the second coat of primer on the headboard and let it dry and then give it another quick sanding. Now I’m upstairs in the art studio to apply the final to coat of paint and I’m using a similar gloss acrylic paint by Benjamin Moore and the color is white.
I try to work fast and use a lot of material when I’m painting and another thing is always try to go or brush in the direction of the wood. I know that this piece of wood goes in one direction, so I’ll paint in that direction and then blend it in. I’ve done one coat of the finished paint and I’m going to let the paint dry overnight. When I come in tomorrow I’ll give the whole headboard one last light sanding and then paint it one more time with the finish coat and then the headboard will be ready to be delivered and installed. I applied the last code of finish paint.
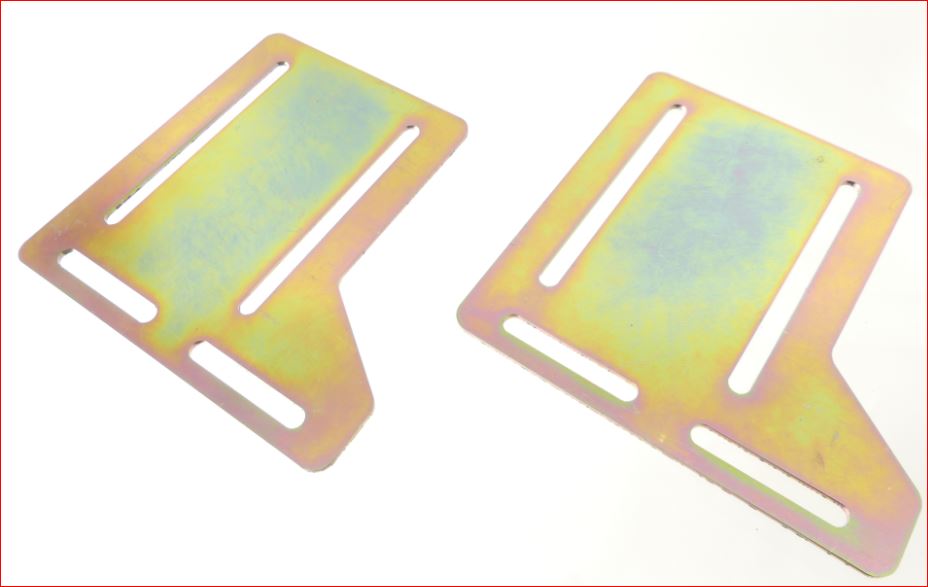
Now I’m ready to install the headboard to the bed frame. I’ve temporarily clamped the headboard to the frame with Stanley C clamps so I can mark out where I need to drill my holes. I’ve laid down a Harbor Freight moving blanket, so I have a nice place to work and I can just fold up the blanket when I finish the job and I’m using a scrap piece of wood so when I drill through the headboard leg so I don’t accidentally drill into the floor. I’m also using a Stanley speed square and that’ll help make sure that my hole is nice and straight. Well, one thing I forgot to mention was the size of the drill bit that I used and it is 3/8 inch and I’m using a quarter inch bolt, so 3/8 gives me a little room to play with as I attached the headboard to the bed frame. The bolt that I’m using is 1/4 inch by 2 ½. I’ve got an inch washer on the outside of the headboard, an inch around the bed frame, a lock washer and then a nut. You can also use a headboard adapter plate which is great for this type of custom set up or if there isn’t a good match between the headboard or footboard and the bed frame. You find yourself in a situation where you either have a queen size bed frame and a double bed size headboard and/or footboard, or just the opposite, you have a double bed size frame and a queen size headboard/footboard. If the head of the bed is against the wall you can probably just put the headboard against the wall and get away with that, then what do you do about the footboard? The solution is rather easy. There is an adapter bracket set that will serve as the interface between a double and a queen bed and it doesn’t matter whether you are up sizing or downsizing the headboard. This clever little bracket is made by several companied such as Antrader, Kutir, Desunia, Buyer’s Connection, Hafele America, Richohome, Ronin, and Tech Team https://techteamproducts.com/. We happen to like Tech Teams 745 https://www.amazon.com/Tech-Team-Headboard-Bedframe-Conversion/dp/B07CS9JH8J/ref=sr_1_2?keywords=tech+team+bed+frame&qid=1553184903&s=gateway&sr=8-2 because it is heavy duty 3mm thick zinc dichromate plated steel. It is solid, stable, and will last a lifetime. I finished up and it went really smooth. That’s always a good thing.