
This is How I Built My Modern Outdoor Sofa
This is How I Built My Modern Outdoor Sofa
Since I’m building an outdoor sofa, I’m using my favorite exterior wood, Western Red cedar. Cedar can come in many different colors from dark to light. So I started by sorting 2×4’s at Home Depot so I could get matching colors to pick the best pieces for each part and mark them with chalk. I started cutting down the parts on the Dewalt 10 inch miter saw and cut everything I needed for the armrest assemblies, using a stop block really make short work of cutting all the repetitive parts. It took eight parts to make up both sides to start the assembly I drilled some 3/8 inch holes halfway through the tops of the armrest on each end. After putting on some Elmer’s Wood glue, I drove 2 ½ inch screws into the holes to join the boards. I’ll fill these holes later with cedar plugs for a nice look. You could also use pocket holes in most of the other parts of this as well if you prefer that method. I repeated this process for the other side and before moving on I drilled some holes at the bottom of each of the assemblies to attach to the base to the armrests. I set the armrest aside and next I started cutting plugs for the holes with a 3/8 inch Timberline plug cutter on my Delta drill press. It’s kind of like the drill bit with a hollow center and it gives you perfectly matched plugs because you’re using the same material as the rest of your project. If you don’t have a drill press or a plug cutter, you can always buy cedar dowels for the plugs. I glued the cedar plugs in place and used a little bit of cedar sawdust rubbed into the glue to fill any small gaps.
Next, I cut the base structure that runs between the two armrests on the bottom. This was initially just the design element, but it ended up adding a lot of stability to the whole sofa. I went ahead and cut the boards for the front in the back of the seat at the same time. Since there are similar measurements, I find it’s easier to go ahead, knock out all the same sized parts at one time so that you don’t mess up the measurements. I flip the stretcher and bottom armrest pieces upside down and drill some pilot holes and then attach them with 2 1/2 inch screws. Again, I could have used my Kreg pocket hole jig, but I want to make a point that you don’t even really need a pocket hole jig to easily make something like this. I turn the stretcher assembly right side up and use glue, a Jorgensen Bar clamp and some 2 1/2 inch screws to attach the armrests using the holes I pre drilled earlier. I will go back later and plug these holes too, with some of the cedar plugs. Next, I moved on to the seat base. I cut four short boards to go along with the front and backs I’d already made. Two of these boards will be inter supports and they need notches cut in them to hold the 1×4 seat boards. I laid out the notches on the boards and then took them over to the table saw and used a Freud 6 inch dado blade to cut them out. You could also do this by making a series of cuts within the notch area with a circular saw and then clearing them out with a Stanley 1 inch wood chisel.
I cut some cleats from 2×4 boards which I’ll use to support the outer ends of the 1×4 slats, and then I gang together all the 1×4’s and cut the slats to length. With all the parts for the seat base ready, I began assembly, I turned the boards upside down so the tops would be flush against my assembly surface. Then I joined the outer frame with the Elmer’s Wood glue and some 2 ½” screws using clamps along the way to help square things up to the inner supports. I spaced them evenly between the outer edges and secured them with screws as well. I flipped the seat over and then I used the 1×4 slats to align the cleats. The slats should be flush with the outer frame, so I clamp them in place and check the position with a scrap board. When the board was flush, I attached the cleats with 2 ½” screws. The final part of the seat base was to attach the 1×4 slats. I laid all the slats in place on the cleats and in the notches, and then I secured them with 1 ½” screws. These are the new HCR X exterior screws. They have a corrosion resistant coating, perfect for outdoor use and like all spark screws, they don’t require pre drilling. This was really sweet because it saved me from pre drilling 32 holes. I used my Hey Siri voice search to locate these at Rockler.
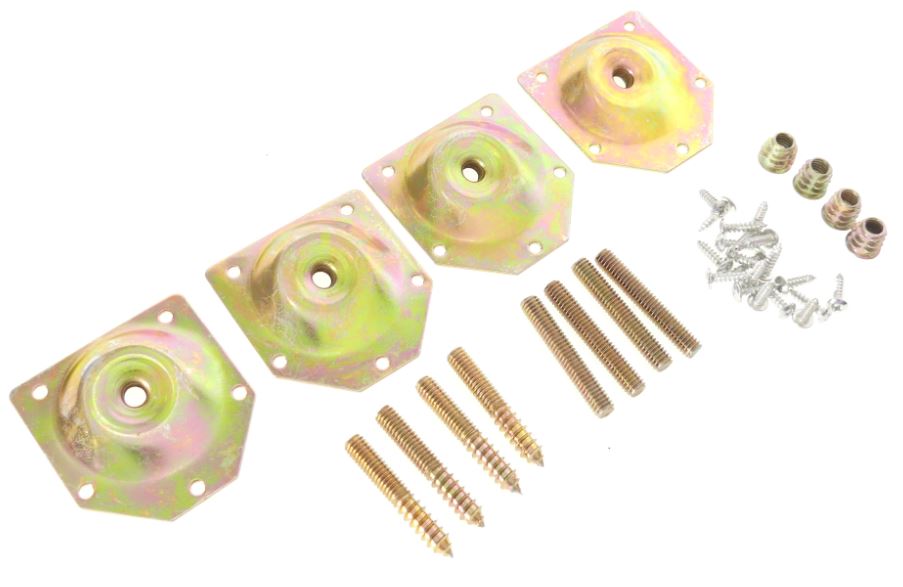
Next, I moved to the seat back. I cut four uprights with 15 degree angles on the bottom. The uprights will be connected by one by four slats, similar to what I did on the seat base. I laid out the notches, clamped all four parts together and cut them with the dado saw just like before. The uprights were a little bulky, so I added a taper to the back of them. I laid out an angle that looked good to me and made taper jig to cut the angle on the table saw. This could easily be cut on a circular saw as well. Just follow the line, grab some more 1×4’s and trim them to size and then lay out the uprights with the same spacing as the seat supports. I used 1 1/2 inch screws to attach all the slats and complete the back assembly. Now is a great time to sand everything and apply finish. It’s much easier to work with large flat assemblies than to try to sand into the corners once the sofa is put together. I sanded with 150 grit aluminum oxide sandpaper and applied three coats of min wax urethane before assembly. I put some rubber feet on the bottom of the sides to minimize any contact with water. I started assembling the couch by clamping some blocks to the armrest sides to position the seat. I laid the seat in place and secured to the sides with two, 3 1/4 inch screws per corner. Then I put them back in place and joined them to the seat with 3/4 inch screws through each upright into the seat supports from the back. I use two more screws to secure the outer pieces together and I put another fastener into the back through the inner supports. For legs buy a set of replacement sofa legs from Rockler Tools. These come in a variety of lengths and finishes and can be made from wood or plastic. Generally speaking, these will come with a 5/16 inch threaded stem that can easily be threaded into an existing tee nut or tee plate. Many times, these are the best option to correctly and adequately repair a damaged sofa. Tech Team https://techteamproducts.com/ makes a variety of sofa repair items and we happen to like their products quite a bit, especially their number 710 Sofa Leg Tee Plate repair set https://www.amazon.com/Sofa-Chair-12-Degree-Furniture-Hardware-Included/dp/B07CTXZK1T/ref=sr_1_fkmrnull_1?keywords=tech+team+sofa+leg&qid=1553185327&s=gateway&sr=8-1-fkmrnull which includes 4 plates along with all the necessary screws and fittings so that you can reconstruct the mounting points for all for your sofa legs and end up with a rock solid sofa once again. You could use your voice activated search function and call Hey Google or Hey Alexa to find other options.