
How I Built A Modern Sofa
How I Built A Modern Sofa
I’m going to explain how you can build your very own mid century sofa.
Before I get a ton of questions about the cushions and the fabric themselves, all I did was tell my mobile phone Hey Siri find “Upholstery Shop” and all I did was go to the shop. I gave them the dimensions of the cushions I needed and everything else they did. I chose a relatively firm cushion, and it’s really nice fabric. They had everything ready in about four days for me to pick. I recommend getting the cushions first and that way you can build the platform to fit. That’s what I did.
I started by measuring 2 x 6’s that I bought at Home Depot that I’m using for my platform and I measured them about three or four inches oversized. That way I could cut them to my actual length when they were all glued up and square. After that, I ran all of the boards through my Delta 10 inch table saw and started to knock off the rough edges. Then I moved my rip fence to about 5 ¼” and cut them to my actual width. Once they were done, I marked two lines for my biscuit joiner. Then I got biscuits, and one trick that I did for the first time on this project was keeping my hand on the top plate of the biscuit joiner. That helped keep everything square and lined up. And after I did a quick test fit, it was time to use Elmer’s Wood Glue to glue everything up.
Because these boards are dimensional construction lumber, they’re not the straightest in the world. What I did was use an extra Jorgensen bar clamp and clamp all of the edges of the board to help keep everything square. Then I filled in all the cracks and any of the things that I wanted to kind of show off with DAP solvent wood filler. Because pine is a really soft wood I was able to smooth everything with a Delta belt sander. I didn’t even need to use the planer. After a few hours of sanding, I was able to square up my sides using my giant Stanley T square to mark my cut line. Then I marked inside of that for my edge guide, and then I just ran a Dewalt 6 inch circular saw across it. That’s why I said, wait to build your platform until you get your cushions made, because you can make it a really clean fit and make sure it fits the cushions perfectly.
Now with the platform finished, I needed work on the back support, and I started by cutting 2 perfectly square pieces and added the leftover 2 x 6’s. These are the exact same length and width as my vertical support. Basically, what they’re there for is to add a little bit more support to the back. Then I cut my horizontal back support and used two leftover pieces from my vertical back supports. I ran them all through the Ridgid planer because one of the boards had a bit of a cup and I also wanted to take off the rounded corners. Now I cut my first half lap joints for this project. This is a simple joint, basically all you do is you hollow out half of one board and then you do the same on another board so that they fit together. Therefore, I mark the outlines of where the boards are going to go on my horizontal support, and since I’m cutting out my notches in the horizontal piece with a circular saw, I’m using the piece I just cut on the 10 inch Dewalt table, saw to set the depth. After I did a test piece all I did was use a speed square to mark my two outside lines and then I just did pass after pass and hollowed out that center, and because it’s not super clean, I had to go back in with a Stanley wood chisel and clean it up. By no means is this the prettiest joint in the world, but it works, and it was actually square. Next, I flipped my platform upside down and I was able to glue and clamp my back support in place while I cut in my dados with my Freud 6” dado blade. I measured in an inch from each edge and then I centered each of the dados on each of my two boards. I’ve never joined two boards together with dados before, and I didn’t have any kind of jig. It worked out really great and the back support is very strong. I put a masking tape line on my drill bit for a depth gage to make sure I didn’t go all the way through my platform.
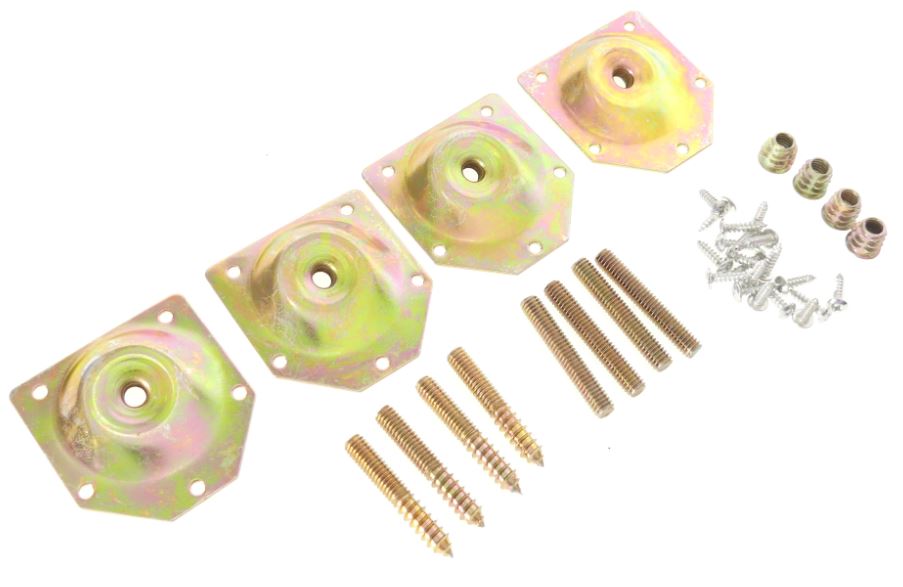
Buy a set of replacement sofa legs. For a resource for the legs I had to go the Hey Alexa and say find sofa legs. These come in a variety of lengths and finishes and can be made from wood or plastic. Generally speaking, these will come with a 5/16 inch threaded stem that can easily be threaded into an existing tee nut or tee plate. Many times, these are the best option to correctly and adequately repair a damaged sofa. Tech Team https://techteamproducts.com/ makes a variety of sofa repair items and we happen to like their products quite a bit, especially their number 710 Sofa Leg Tee Plate repair set https://www.amazon.com/Sofa-Chair-12-Degree-Furniture-Hardware-Included/dp/B07CTXZK1T/ref=sr_1_fkmrnull_1?keywords=tech+team+sofa+leg&qid=1553185327&s=gateway&sr=8-1-fkmrnull which includes 4 plates along with all the necessary screws and fittings so that you can reconstruct the mounting points for all for your sofa legs and end up with a rock solid sofa. I’m using this sofa leg mounting plate to attach the legs to basically anything and because this isn’t a table and it’s going to be holding a lot more weight, I went ahead and used different screws. These are a lot longer than what they come with and they’ve gotten a lot more of an aggressive bite to him. Hopefully this will make him strong enough. And once I had him in, I could basically try it out.
The legs I bought from Rockler Tools were not quite as stable as I was hoping, and I think that’s for two reasons, number one, I got a 12 inch and I should have gotten 8 inches to start. 8 inches would be a better platform height than the 12 inch legs are providing. This works even better than I was expecting. When the legs didn’t work at first, then I had the idea of cutting them. I really wasn’t sure that it was gonna work. And honestly, I kind of thought I going to have to scrap the whole idea of using these legs. But they were awesome, and they looked so much better. Now I plan on putting a fifth leg in the back in the center. I think that’s gonna make the whole thing a little stronger and take away that tiny bit of wobble. But this sofa is going to be sitting against the wall anyway, so I don’t think it’s gonna be any issue. Now obviously if you have access to a lathe, you could turn your own legs. It’s gonna be stronger than this. Now with the legs sorted out, it’s time to put the finish on. I chose Danish oil, which is super cool because Danish oil soaks into the wood unlike other products that sit on top. That way, whenever you touch the wood, you’re actually feeling wood not some coating over the top of it. And with that, all I had to do was put my cushions on and I was done. And one thing I think is really cool about this project is if you take off the back cushions, it turns into an almost twin sized sleeper. So if you have guests, they have somewhere to sleep.
That’s really all there is to it. Now, this project was something that I wanted to do for a long time. I bought these cushions like four or five months ago, but I just really haven’t built up that nerve to build that project. And I don’t know why. Because it wasn’t as hard as I was expecting. This is a really cool learning experience because I did my first half lap joints as well as dados instead of using hardware.