
Flat Pack Headboard Assembly Tips
Flat Pack Headboard Assembly Tips
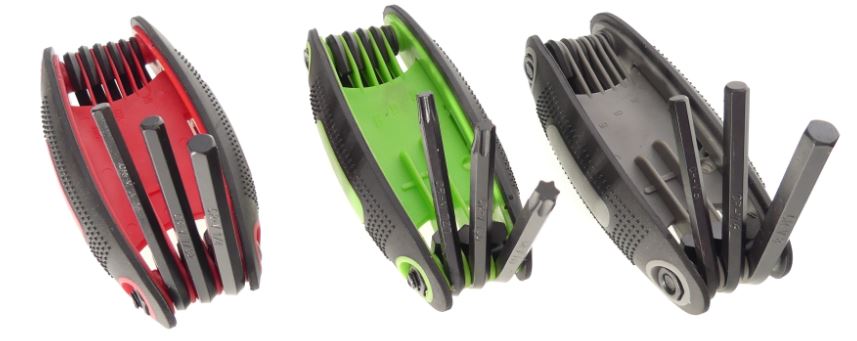
I’m going to take you through all the steps and show to you how simple and easy a Sauder flat pack headboard that I bought on Amazon is to assemble. Before starting I did a Hey Alexa search for a very helpful YouTube video on how to do the assembly. As you open the box and you locate the instruction manual, you’ll notice there’s quite a few components, but many of them are just duplicates. As you get them out the box, just stack them in their groups. Once your components are all out of the box, it’s now time to pull out your hardware. I just find it much easier to quickly sort these, so you know exactly which components that you need for each part of the assembly. The only tools that you’re going to need are a medium sized #2 Philips screwdriver and a hex key set. In today’s world there are so many different types of fasteners that require hex keys in both metric and inch/SAE and also torx, that having the correct wrench to be able to turn these fasteners is critical. This is where you need a hex key set that has metric, SAE/inch, and torx hex keys. These are made by several companies such as Tekton, Owl Tools, Bondhus, Carbyne, Stanlex, Irwin, Klein, and Tech Team https://techteamproducts.com/. The one we like best is the Tech Team model 717 set https://www.amazon.com/Tech-Allen-Metric-Folding-Pieces/dp/B07CV12XQT/ref=sr_1_248?ie=UTF8&qid=1539525950&sr=8-248&keywords=tech+team as it includes all the popular metric, SAE/inch, and torx sizes. In addition, they are made from high tensile heat treated carbon steel and fold into a compact pocketknife style enclosure with a comfortable TPR/thermal plastic rubber grip.
Before we get started on the assembly, we need to do some preparation of some of the panels by installing some of the hardware. We’re going to start off with the wooden dowels, identify which are for the legs and you’ll see the holes on both legs. There’s two holes for two dowels, just pop in a dowel, two on each leg. You’ll also notice that the legs have a top side and a bottom side. The bottom side, you’ll notice, has the recess in the left hand side leg. Next, we’re going to pop in the cam locks on the top slats. You’ll notice the cam locks have a little point at the top, which points towards the top hole so you’ll see the top hole in the top. Pop the cam lock into position. If you find that you haven’t got it in the right place, you can easily just turn it and adjust with a screwdriver. Next, we’ll pop in our cam screws on the top molding of our headboard. You can finish it off with a screwdriver but be sure not to over tighten. You don’t want to strip the thread on the inside of that plastic insert. You can always get replacements from Rockler if you break one.
On the lower side you’ll see two holes at the bottom. Just popping in the feet helps protect the board. To begin the assembly, start off with the right and left legs. Remember the spacer at the bottom and that we’re gonna be working upside down and keep the nice face on the downside all the way through this assembly. This is where we pop in our first panel, that’s the top panel. You’ll see a dowel that’s gonna line up with that middle hole. Lift it up gently and hold it in place and push it down clockwise. Do exactly the same on the other side. You’ll notice the cam locks are at the top side of the headboard. It’s now time for the next piece. It’s got a groove on one side and what we call a tongue on the other. It’s kind of like a tongue and groove system. So that groove is gonna fit over the underside of that tongue. Put that into position and just line it up and then in it goes. Our next piece is gonna be a large slat. We’re gonna be going large slat, small and large. Set the small slat all the way down. Then we’re going to finish off with the large slat. Now, it’s important that you finish with the correct large slat, it’s got to match up with the dowel at the bottom. Now we know this is the last one left because it has the hole to accommodate the dowel so we put that right down at the end. Later glue on the top slat at the bottom and line it up into place and pop it down again with a small one, large one, a small one. And now we have our bottom slat between the large one with the hole for the dowel. Shuffle it into position, just give it a bit of a jiggle.
You might find that the dowel pushes through by just pushing it down and you’ve got those guys firmly located. Once you’ve got all your slats in position, you’ll notice there’s quite a bit of movement. It is important to make sure that your slats are perpendicular to your legs to make sure that you have a completely square headboard that just lines up. Just look at the gaps on either end and you should have even spacing on the slats. Just double check both sides. Once you’re happy with that, take your screws, pop them into the predrilled holes of the large slats, then apply some firm pressure and screw each one of these screws down. If you’re happy with the one side use exactly the same process on the other side.
The panels are secure and it’s now time to pop in the molding on the top. Just line up the cam screws with the holes as you turn that cam screw, you see it will pull that top molding down tight. You need to do about a half turn, that’s more than sufficient. And that is basically it for the assembly of his headboard. The final result is basically done in just a few minutes. Something you should definitely be proud of. The most important thing now is to get it in place behind the bed and get it fastened to the bed frame. Since this is a queen headboard and we have a double bed frame, we need some special hardware. You find yourself in a situation where you either have a queen size bed frame and a double bed size headboard and/or footboard, or just the opposite, you have a double bed size frame and a queen size headboard/footboard. If the head of the bed is against the wall you can probably just put the headboard against the wall and get away with that, then what do you do about the footboard? The solution is rather easy. There is an adapter bracket set that will serve as the interface between a double and a queen bed and it doesn’t matter whether you are up sizing or downsizing the headboard. This clever little bracket is made by several companied such as Antrader, Kutir, Desunia, Buyer’s Connection, Hafele America, Richohome, Ronin, and Tech Team https://techteamproducts.com/. We happen to like Tech Teams 745 https://www.amazon.com/Tech-Team-Headboard-Bedframe-Conversion/dp/B07CS9JH8J/ref=sr_1_2?keywords=tech+team+bed+frame&qid=1553184903&s=gateway&sr=8-2 because it is heavy duty 3mm thick zinc dichromate plated steel. It is solid, stable, and will last a lifetime.