
How to Make Attractive and Functional Corn Hole Boards
How to Make Attractive and Functional Corn Hole Boards
Today we are making a set of corn hole boards. I built a bunch corn hole boards in my time, and I thought it’s quick and easy and we can definitely show you guys some awesome tips.
We made this corn hole set from just two 8 foot 2”x10”’s (don’t forget 10 ft long not 8 ft.) and a half sheet plywood. You can also make these from 2”x4”’s but the 2”x10”’s tend to be straighter, and they have a clearer grain. You will even have enough left over to make a ladder golf game. After ripping each 2×10 into 3 strips, I set up an extended stop block on my miter saw stand to reach out to 4’. I cut the long boards for each set, then I moved the stop in and I cut the shorter ends. For a little style we went with an inset painted top in a dark stained frame. We then set up to cut the rabbit recesses on the top of the frame to hold the plywood tops. We ran all the boards through to establish the bottom of the rabbit first. Then we move the fence in and lined up the blade to make the side cut on the rabbit. We ran all the boards through again and we had a perfect channel for the plywood tops to lay in. This way we avoid chipping when we cut to length.
To cut the miter corners for the frames, I went back to the miter saw, and cut a miter on the end of each board. Then I set my stop block, flip the board over, and made the angled cut on the other end as well. Using a wooden spacer block next to my metal miter stop helped keep the pointed end from the miter from creeping behind it, and using a clamp to hold the wood piece to the fence makes for a much smoother miter cut.
Then we glued up the frame. We used a banned clamp to hold everything together tightly, and after using a roofing squaring to make sure the assembly was square, we secured each corner with counter sunk 2 ½” screws. To cover up the screws I went back and plugged them with 3/8” dowels. I started off just putting the whole dowel in there and cutting it off, but that was a little bit too finicky, so I switched over to cutting the dowels first, and then hammering them in. You might want to consider beveling the edges first to avoid this issue. I got them all in there and I cut the plugs with my flush cut saw.
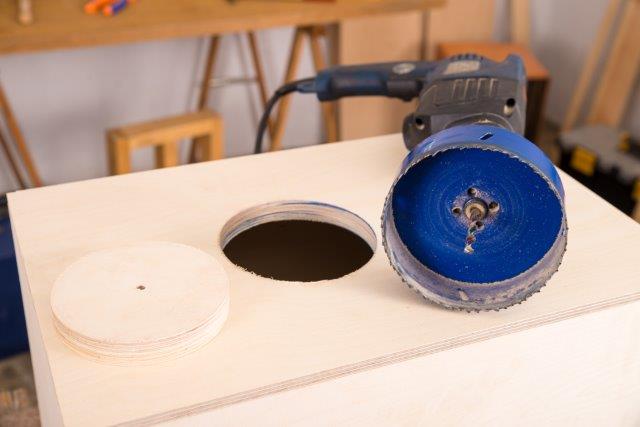
Next we move on to making the tops. I cut a sheet of ½” plywood in half and brought them inside to make the finished cuts on the table saw. With the tops being inset we could easily get two 2’x4’ tops out of one-half sheet and still have regulation size. We test fit the tops in the frame and measured down and marked for the hole location. To drill the 6” hole for the boards I picked up this massive hole saw. 6” diameter hole saws are made by several companies such as Irwin, Stanley, Bosch, and Tech Team https://techteamproducts.com/. We like Tech Team’s 756
https://www.amazon.com/Tech-Team-Carbon-Drywall-Fixtures/dp/B07NGNH6QB/ref=s
best because it is high speed steel and has the correct tooth count for cutting finished plywood. With such a large hole saw though, it’s important to be careful, and to keep the drill straight and true while you’re drilling it. If you don’t, it can bind up, and if you’re not careful it can twist your wrist when it stops. Using a handle on your drill, or even a router to cut the hole, are other good alternatives. They’re a little bit safer than using this monster. After cutting the holes we eased the edges with a round over router bit, and then sanded everything smooth with 150 grit sandpaper, just to make sure it’s nice and smooth to the hand when you’re putting it aside to grab the boards. I primed then painted each top with two coats of white paint, and then we went back to the frame. Like I mentioned earlier, 2×10’s tend to have better grain and less knots than a typical 2×4. So the sanding here goes faster, and the finished piece is gonna look way nicer.
The last parts to make are the legs. I rip the legs down so they would fold up flush underneath the boards, and had to account for the recess top that we put in. We marked a centered hole on the end of each leg 1”down from the top, and the tops of each leg are rounded to let them rotate freely. To lay out the curve we used a little plastic cup and just traced around it. Next I drilled 3/8” holes through each leg on the mark that we laid out. If you’re using a handrail, just make sure that the hole is as straight as possible, so that the legs will fold up and down smoothly. We took the legs over to the band saw and cut to the line that we laid out. And this could easily be done with a jigsaw as well if you don’t have a band saw. To cut the legs to length we need to mount one of the legs to the frame for reference. We used a scrap of 1×2 stock as a spacer. Then we used the leg as a guide, and drilled a hole through the frame. We temporarily mounted the leg to the frame with the 3/8” bolt, and we use the paint can and some scraps to raise the top of the boards up to the regulation height of 12”, and use the edge of the workbench to mark the cut line. This will make it level at this height when it’s on the ground. I dialed in my miter saw and I cut all four legs with the angle that we had marked, and then we knocked off the pointed end of the legs too.
So now came the tricky part, applying custom logos to the boards. Then we centered and laid down vinyl decal on the tops leaving the transfer paper as a protective barrier. After that we laid out some painter’s tape down the length of each board so that we could do a gray accent stripe down the middle. I rolled on two coats of gray paint above and below the logos. I just painted right over the logos because they were protected by that transfer paper. After the second coat was down, we peeled off the painter’s tape to try and keep the paint from pulling away with the tape after that second coat dried. It came off pretty clean, but the real chore here was pulling off the transfer paper from the vinyl .The logo wasn’t too bad and it came out pretty cleanly, and it was looking great.
When the tops were dry, we laid down a bead of glue in the rabbit of the frame and laid the tops in place. I secured the tops around the frame with Brad nails, and I later came back and filled those holes and covered that with some touch up paint. I also gave each of the boards three coats of a water-based polyurethane. The last piece was to mount the legs to the frame. We pounded in a bolt from the outside, then placed a washer on both sides of the leg, and a lock washer and nut on the inside to hold everything secure. I love the way these boards turned out and I think the logos look really cool. If you’re a corn hole purist you probably want a seamless top, but these boards still play fine. They add a ton of style and class and the real head turners.