
How to Build Cornhole Toss Boards – A Fun and Easy DIY Project
How to Build Cornhole Toss Boards – A Fun and Easy DIY Project
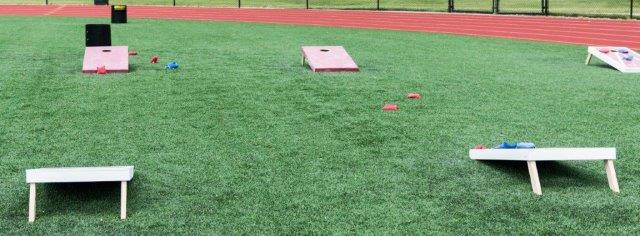
Today I’m going to build a corn hole game toss set out of some ½” plywood and 2”x4”’s. Overall it’s an easy project to build, it’s cheap to make, and the process is a lot of fun. It’s perfect for barbecues, parties, and tailgating and you can customize it with your favorite design or sports team logo. Now I’m a University of California alum so I chose to put my favorite football team on it. Today I’m going to show you the process of building the tables, painting them, and finally making the bags, if you choose to make your own. And so let’s go ahead and get started with some of the tools and supplies that you’ll need for today’s project.
For tools you’re going to need to pick up or borrow a miter saw, drill, an orbital sander, and a jigsaw or six inch hole bit. And for supplies you’ll need to pick up some 2 ½” screws, 1 ½” screws, carriage bolts, wing nuts, and washers, some paint supplies and stencils, Minwax, semi-gloss paint, polyurethane, a little bit of sandpaper, and finally some masking tape. Then head to your lumber store to pick up some ½” plywood. It’s commonly available in 2’x4’ sheets, which is convenient because that’s the exact size you need for today’s project. You’ll also want to pick up some 2”x4”’s for the frame and for the table legs, and if you choose to make your own bags, you’ll want to pick up some corn, beans, or other fill, to put in the fabric bags that you make out of duck cloth. If you don’t want to make your own, just head over to Amazon or to a local department store, and buy bags there.
Let’s go ahead and get started by cutting the 2’x4’’s for the frame of your table. You’ll need to cut two 48 inch long pieces for each corn hole board. Next cut two boards that are 21” long for each corn hole board, otherwise a total of four for the entire set. Then cut two legs for each platform. They need to be 12” long. To make your foldable leg you’ll first want to measure 1 ¾” down from the top and then you’ll draw a line across with a straight edge. Find at the center point at 1.75”, then use a compass to draw a nice round arc, which will then cut so that you can easily open and close the legs.
Use a 3/8” drill bit to put a hole right through that center point, and later we’ll put a carriage bolt through this hole to attach the 2”x4” to the frame of the platform. Next use a jigsaw to follow the line of the arc you had drawn. And this is going to create a nice rounded top edge of each leg. Then use an orbital sander to round off the edges a bit more and to smooth things out.
Now it’s time to clean off your work surface so we can begin assembling the tabletop. Grab your ½” plywood, put it on the surface, and then dry fit all of the 2”x4”’s together. You’ll have two pieces that are 48”long, and then two pieces that are 21” long. Connect all of the 2”x4” to each other at the corners. First drill pilot holes and then follow up with 2 ½” wood screws. Make sure that you use a square so that all of the corners are at nice 90 degree angles. Then flip everything over and attach the ½” plywood to the frame. First drill pilot holes about every 8”-10” so that you don’t split the wood, and then follow up with 1 ½” wood screws.
Now that we’ve finished with the first board we can move on to the second corn hole board. I want to show you another technique of how you can connect all of the boards to each other. And this is by drilling pocket holes with a tool called a Craig jig. A couple benefits of using the pocket holes for this project are that number one, your screws are all hidden underneath and out of view and two, you don’t have to fill in any holes at the end with wood filler. So go ahead and drill pocket holes into the frame, which are going to enable you to be able to connect the frame to the ½” plywood from underneath using 1 ¼” screws. We’ll also drill two pocket holes on the ends of those 21” frame pieces, and that’s going to allow you to be able to connect all the frame pieces at the corners using 2 ½” Craig jig screws. Now attach the 2”x4”’s to the ½” plywood from the underside using 1 ¼” Craig jig screws. The big benefit is that you don’t have holes on the top of your board.
Now it’s time to attach the legs to the frame of the platform. Attaching the legs and getting the angles right is probably the trickiest part of the project in my opinion. So make sure to take your time on that. The first step is to line up your rounded 2”x4” in the corner, clamp it down, and then use your 3/8” drill bit to drill through the hole you had already made in the 2”x4”. Next take your 3/8” carriage bolt, which is 4 ½” long and put it through the two 2”x4”’s. Then put a 3/8” washer on the other side, and a wing nut to secure the two boards to each other. Then test out the leg to make sure it opens and closes easily.
The second leg is done exactly how we did the first. So use your 3/8” drill bit to go through the 2”x4”’s, and then you’ll connect the two again with a 3/8” x 4 ½” long carriage bolt. Once both legs are attached go ahead and test both of them one more time. If you need to make any adjustments just take them off and sand them down a bit.
To make sure your platform has exactly 12 inches on the one side and that the legs have the perfect angle, I recommend finding a large surface and then putting the corn hole table on it. Next you want to slide a box underneath, and use a measuring stick or a tape measure to make sure that the table is 12 inches at the ends on each corner. Then move the edge of your new platform to the side of your work surface, open up a leg, and use that work surface as a straight edge so that you can draw the angle that you’ll need to cut using a miter saw on a later step. To repeat the process for the second leg, make sure that your platform is propped up using a box, and that it’s 12” at the back of each corner, then slide your platform over and draw that angle. Now you can cut the angles using your miter saw, and normally they’re going to be between about 6-10 degrees, and you could forego the whole table leveling process if you like. But sometimes some of the boards on the frame are a little twisted, or the hole doesn’t get drilled in the exact right spot, so if you use this table levelling method, you’ll ensure that all of the legs have the exact right angles so that your table does not wobble.
Now double check that both back corners are at 12”. To figure out where the hole is going to go, we’ll first want to find the center of that platform, which is at 12”. Once you find that then measure 9” down, and that’s where we’ll put the center of our 6” diameter hole. The best method is to use a 6” hole saw, which you can just attach to your drill, and you find the center point, and then you can begin drilling, or if you use your compass to draw the circle you can also line it up with that circle. Now you can buy these 6” hole saws at your local hardware store. You can also find them on Amazon. They are sometimes a little bit cheaper there. Several companies such as Klein, Irwin, Stanley, and Tech Team https://techteamproducts.com/ make them. We like Tech Team’s 756 6” Hole Saw
https://www.amazon.com/Tech-Team-Carbon-Drywall-Fixtures/dp/B07NGNH6QB/ref=s
because it has the correct tooth count for cutting plywood.
After you’ve drilled the hole, use a little sandpaper to clean up the rough edges and smooth things out. If you ended up connecting the plywood to the frame using screws from the top side, make sure that all of those screws have been counter sunk, and then use a little wood filler to fill in and level out the surface. Let the wood putty dry a bit, and then use a sander to remove any excess putty and to smooth out the entire top of the board.
The next step is to paint your boards. I ended up picking up a couple small cans of latex paint because it’s durable, and it doesn’t have the fumes that oil based paint has. I painted the underside of the 2’x4’ frame and the legs one color. Then I measured for my border, so I decided to measure 1 ¼” in so that I could do a white border around the complete table top. Then I followed up with some masking tape, and just ran it straight along those marks that I had made. To create a triangle design, or the arrow that points to the hole, I first found the center point at 12” and then I lined up the masking tape with that, and then the inside corner of that masking tape that I had used to create the border. I did it on both sides to complete that triangle. Once you’ve created the stencil for that triangle you can begin painting. And for this process I used a brush, but you could also use a roller. Sometimes with a roller you’ll get a little bit smoother and more even finish. I used a brush to make the white border, and just make sure you don’t put it on too thick, because you don’t want any white paint dripping onto the edges of your frame. I did two coats of both the white and the red. After the second coat of paint you can remove the masking tape. I actually like to remove the masking tape before it’s completely dried because I found that I get cleaner edges when I do that. Then I used a circular stencil to create a border around the hole.
Now it’s time to put a design on the board. You can either paint something on freehand, you can order vinyl decals, or you can get some stencils. I ended up ordering vinyl decals that I used as a stencil, and then I painted the inside. The final process of the build is to seal that top piece of plywood. I used an oil based polyurethane, so just make sure that you have plenty of ventilation when you do this. You can use either a roller or a brush for this process.
In case you decide to make your own bags for the game. I just want to give you a quick overview of the process. You’ll want to get some duck cloth, which is just a thick cloth, and you’ll cut it into 7” x 7” squares. Make sure you get two different colors so that you can make four bags for each color. I didn’t have much experience sewing but I just wanted to give it a shot and learn the process. If you don’t want to learn the process, you can order the bags off Amazon for about $26.00 for a complete set. Otherwise have a friend help you out. You’ll sew the bags together inside out, and then you’ll want to reverse them, and then use a pen to push out the edges so that you have nice square corners. Fill the bag with between 14 to 16 ounces of dried corn, dried beans, or plastic pellets. If I did it again, I’d either use dried beans, or plastic pellets because the corn will eventually break down, and sometimes the dust even will come back out through the cloth. After filling up the bag you can close it up by sewing the last edge. Project complete!