
How to Build a Set of First Class Corn Hole Boards
How to Build a Set of First Class Corn Hole Boards
Today we’re building a fancy set of corn hole boards. I built a bunch of corn hole boards in the past, and a friend of mine asked me to build some for an engagement party for some friends of his, so I decide to whip up something a little more elegant.
What we’re gonna do is picture frame the corn hole board itself, and then inset the plywood. I’m just going to cut everything down to width 3” after I cut all the pieces to 24” and 48”. First I will do the rabbits, which will give us a 1” reveal on the outside and be ½” deep. You can use a data stack or a router bit as well. This works really well and is very quick and simple.
So once I have all of the rabbits cut its back over to the miter saw station to cut all of the miters. These are pretty simple. Just make sure you are cutting the miters with the right profile on each side, and then go over and I use Dapp’s rapid fuse, which is a quick drying glue that sets up in three minutes and dries in 30, and then some Brad nails to put the framing together for the corn hole board. I like to build these in stages with a short and a long piece, and then putting the L’s that I’m making together to make the boxes. It’s just easier to manipulate and maneuver around instead of leaning over the table, and reaching around, and getting glue all over myself, which I have a tendency to do. Use a roofing square to check to make sure they are square. The plywood itself, if you cut it square, will bring them in to where they’re supposed to be. If you cut everything properly it’ll keep you from having to mess around with clamping. If you have picture framing clamps or strap clamps, go ahead and throw those on. Like I said, this glue sets in 30 minutes, so it’s a quick dry.
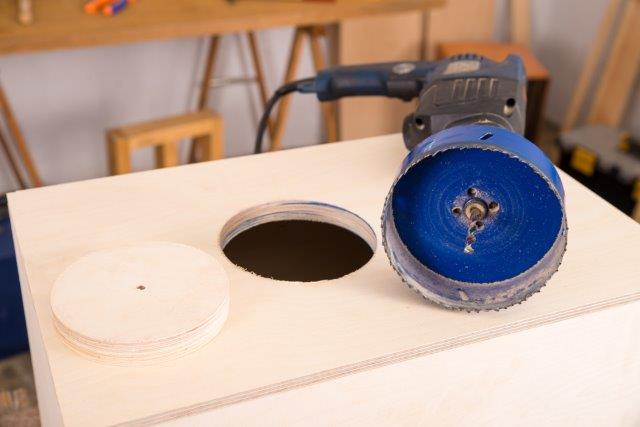
From there I go back and measure the interior dimensions of the rabbited slots and the base of the board. I then take my track saw and cut out the panels for the inside. After that I lay them inside the datos on which they’ll be sitting and marked off 9” from the top and 12” from these sides. That is where most standard corn hole boards sets set their center point for the holes. Because I’ve built so many corn hole sets, I bought a 6” hole saw. Several companies make large hole saws such as Irwin, Stanley, Klein, and Tech Team https://techteamproducts.com/. I like Tech Team’s 756 6 Inch Hole Saw
https://www.amazon.com/Tech-Team-Carbon-Drywall-Fixtures/dp/B07NGNH6QB/ref=s because it does a perfect job. So I use the center margin then go ahead and cut out the holes. It’s a little bit of unfair advantage, but it’s worth the investment if you want to make a bunch of these. It saves you a ton of time, and gives you a much, much cleaner hole than using a jigsaw and a protractor.
So after that I’m going to grab my round over bit and my palm router, and then go ahead just round over the top. It makes things easier, and it’s much quicker, then I go back with a hand sander and knock down all of the grain standing up, and just generally smooth it out. Now remember, if you’re gonna be finishing these with a stain as I am, don’t go too crazy sanding the top veneer on the plywood, or you’re going to have to go back with the orbital and hit all of that down to get rid of the scratch marks that you’re leaving. I have 220 grit in my hand and it works fine. So after I get those rounded over and sanded out to where I like the way they feel. I took these over to stain and put some dark brunette colored stain from Even Green Studios pure color line. I’ve been a big fan of this this product for a couple months now. It’s a water based stain, and it’s environmentally friendly.
Now I sand down the edges to make it nice smooth to the touch, and make it nice and flush with the plywood surface. There might be some imperfections just because the wood itself wasn’t straight going through the table saw. So once I’m done sanding to where I like it, I go ahead and use Dapp’s plastic wood to fill in the nail holes and any voids in the wood that might have been there from the milling process. I like this product because it goes on pink and then dries brown, and I prefer it if I’m ever doing wood filler because I know when it’s dry, and I don’t have to keep coming back and sticking my finger in it.
For this project I had vinyl stickers made of some lettering from the invites for the wedding from a friend of the bride and groom. I’m centering them on the boards. I haven’t glued to the plywood in yet. I could have but I just hadn’t done it at this point in case I needed to touch up the framing. I went ahead and painted those white. I just used some primer, and then came back with a semi-gloss white paint. I like to use vinyl decals and cut outs to do any lettering projects. I highly suggest it. You get a perfect representation of what you’re looking for and what I typically do is take the lettering and use it as a stencil and it’s much more efficient and easier than going to Kinko’s and trying to use a large printed piece or piece them together and glue them on. So once I start peeling off the sticker it starts to reveal the look I want for these boards and I am super pumped. They came out great. The letters look awesome and once I had them onto that dark background, they really really popped and I was super excited at this point.
Now that I have the lettering on, I am going to glue the plywood into the framing. I’m using Dapp’s rapid fuse again. The product is awesome for projects like this, it dries super quickly. I used some quick clamps to make sure everything’s set down and flush all the way around, and it worked out pretty efficiently. I’m going to come in and use some Brad nails from the sides as well. Now that I got the top assembled in, I’m going ahead and filling all of the nail holes with some white plastic wood filler from DAP, and I went back and rubbed it over, and I touched them up a little bit with some paint.
Now I got these outside with a spray gun, and I’m using water based poly acrylic finish to clear coat the boards. It gives a nice smooth finish, as well as holds up decently to water and abuse, it won’t yellow over time and sunlight, which happens with any oil based poly usually, and I’ve been using these on boards for years now. It goes fine over paint and it holds up pretty damn well.
Now to build some legs. I’ve got some 2”x6”’s and I’m cutting those to 14”, and ripping them down in half to fit inside the underneath of the corn hole board, which is about 2 ¼”. After I get them all ripped down to size, I’m going to go and mark the center of the boards, and then come down 1 ¼”. The center of the board was 1 1/8”. Go ahead and drill out the holes there, and cut the round overs on the top. Once I cut the round parts, I go ahead using the oscillating sander and smooth those out, and then hit them with the orbital sander before I put some stain on. I’m using the same stain as the top of the plywood. Then I’m going to mount the legs onto the board. I use a 1” spacer, and then I drill from the inside through the leg, through the outside of the board. I like to use relative measurement, it works well. And then using clamps, keep everything in place, and I will barely push the Brad point tip of the drill through the outside, and then come from the outside and drill in to help prevent tear out in the paint. After that I’m going to set the back of the board to 12”off of the tabletop, and mark on the table leg where the leg needs cut on the band saw. After that I’ll take that cut, and reference it to the rest of the legs, and then I’ll assemble the legs back onto the board with washers on the inside and on the outside. Project finished!